
“Trucking Along for Your Birthday: A Delightful Journey with Pink Balloons and Presents!”

Good Morning Stampin’ Friends!
Hope you had a wonderful weekend. We certainly did – went to dinner with my grandchildren. Two are adults and one is a teenager so they lead pretty busy lives and I am blessed to be able to see them often.

- DSP Paper Share
- Retired SU Products – priced to sell!
- Kits Collection by Stampin’ Up! Sale – up to 30% off
- Bonus Days Redemption Period – don’t forget to redeem your coupons!
- September Paper Pumpkin – Celebrate all Things Autumn
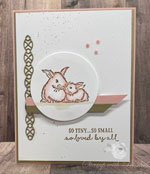
Whether you’re a seasoned crafter or new to the world of stamping, the Trucking Along Stamp Set and Punch is a versatile one as you can see by the various cards out there in facebook land or pinterest land.
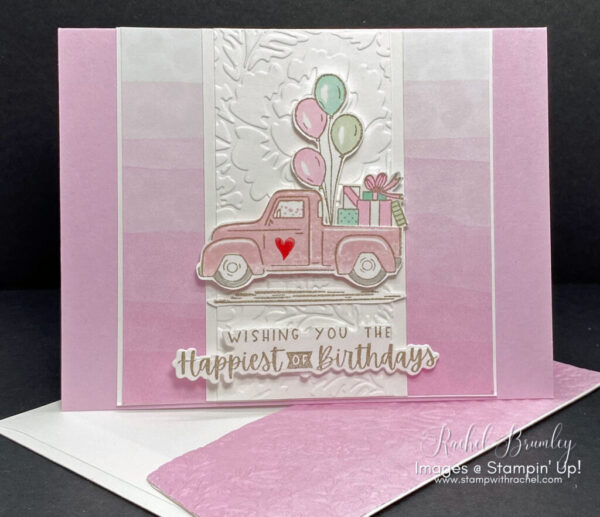
Creating a card using the Trucking Along Stamp Set and Punch, along with the Pretty Flowers Embossing Folder, in the color Bubble Bath can be a fun and creative project. Here’s a step-by-step guide to help you get started:
- Create the Card Base:
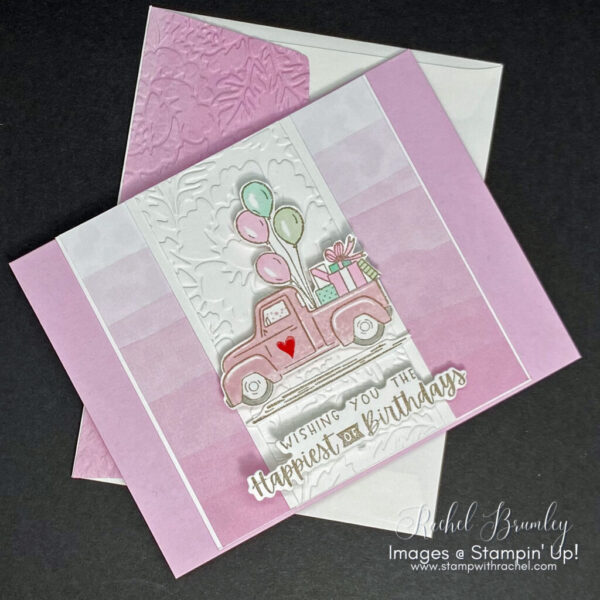
- Cut Bubble Bath cardstock (8 1/2″ x 5 1/2″)
- Fold the cardstock in half to create the card base using a Bone Folder for a sharper crease.
- Emboss
- Take the Basic White cardstock (4 1/4″ x 2″)
- Place it inside the Pretty Flowers Embossing Folder and run it through the Cut & Emboss Machine
- Using Bright & Beautiful DSP, take a strip of DSP (for inside card 5 3/8″ x 1/2″ and for envelope flap 6″ x 2 1/2″) and emboss using the same embossing folder.
- Stamp and Punch the Truck and fussy cut the other images:
- Stamp the truck image from the onto Basic White cardstock with Gray Granite Ink.
- Stamp the solid truck image with Bubble Bath Ink
- Take the small heart image from the Country Bouquet Stamp Set, color in the heart with the Real Red Stampin’ Write Marker and stamp on the truck door.
- Stamp the balloons from Zany Zoo in Gray Granite onto Basic White Cardstock and color in using the Bubble Bath, Pool Party and Soft Sea Foam Stampin’ Blends. Fussy cut with our Paper Snips.
- Repeat for the presents image from the Trucking Along Stamp Set.
- Assemble the Card:
- Attach Basic White cardstock (4 1/4″ x 4 1/4″ to the front of the card
- Glue two strips of the Bright and Beautiful DSP (4 1/4″ x 1″) to each side of the Basic White cardstock.
- Adhere the embossed white cardstock onto the center front card base using adhesive.
- Attach the punched truck image onto the embossed cardstock using Stampin’ Dimensionals for a 3D effect.
- Add the balloons and presents with Stampin’ Dimensionals (see pix for placement)
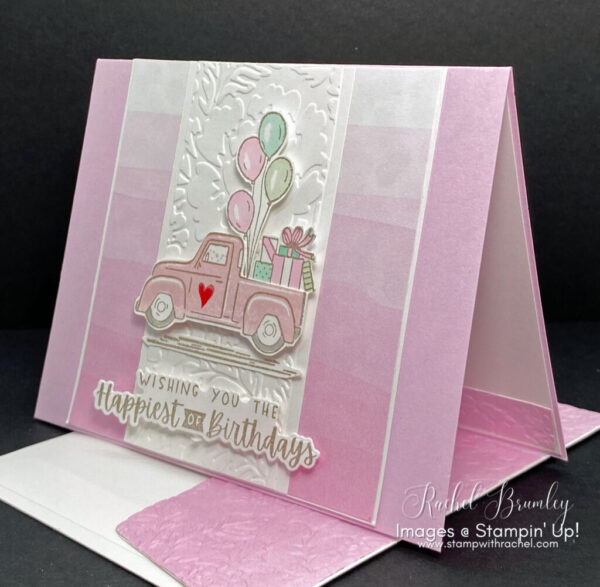
- Add a Sentiment:
- Stamp a sentiment from the Charming Sentiments Stamp Set Bundle onto a strip of Basic White cardstock using Gray Granite Ink.
- Cut with the coordinating die from the same bundle.
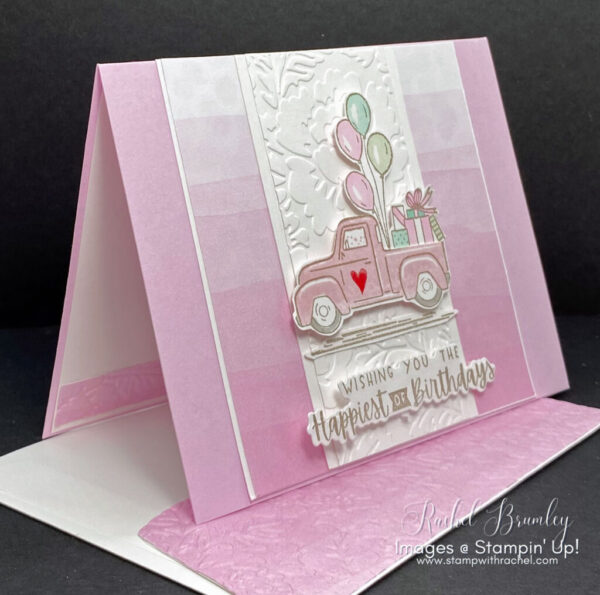
- Inside the Card (Optional):
- Cut a piece of Basic White cardstock to 5 3/8″ x 4 1/8″ and attach to the inside
- Attached the embossed strip of Bright & Beautiful DSP.

I just wanted to take a moment to extend my sincerest gratitude to each and every one of you who has taken the time to visit my blog. Whether you’ve been here from the very beginning or you’ve just discovered my blog recently, I appreciate every click, read, and interaction.
Thanks again for stopping by and spending a bit of your time with me. I hope you enjoyed learning about how this card came together. Hopefully you were even inspired just a bit. If you enjoyed my project for today, please be sure to visit my Card Gallery for lots of ideas and inspiration. Have a great day!
If you need any items to make the above project and/or stampin’ supplies, I’d be very happy to be your demonstrator. Just click on this link for instant access to my store.
Or you can drop me an e-mail if you have any questions or would like for me to place the order for you.
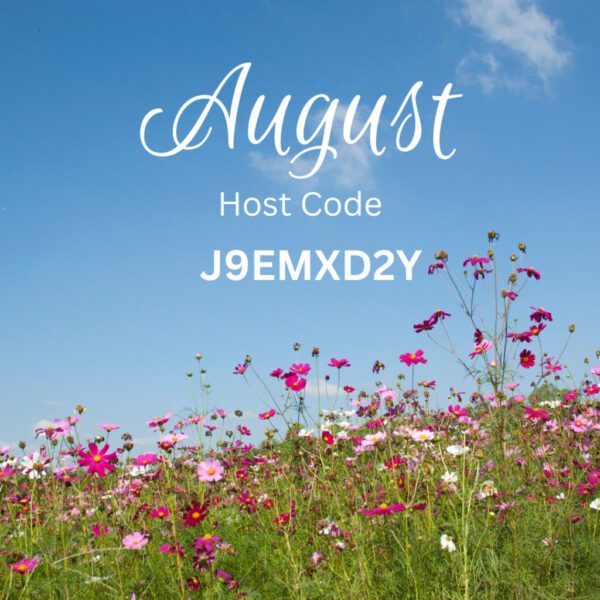
The free gift for August is anything from the catalog or online exclusive for $10 or less.
Use this month’s host code when you order $35 or greater and receive that month’s free gift from me! If your order is over $150, please do not use this code. Not using my host code (if your order is over $150) entitles you to free Stampin’ rewards and you’ll still get the monthly free gift.
Note: Make sure that you can see my name on the final checkout page listed as your Demonstrator when you order so that you know that you’re ordering with me.
To see what you can get for $10 or less, click here

Product List

Thank you so much for sharing your beautiful card. I make cards for a local Breast Cancer Center. (The doctor and nurse send handwritten cards to each patient!) I needed to get out of my rut and make something different. This design will be perfect! I can’t wait to play! Thanks again for sharing your card as inspiration!
Thanks Wendy S. I need to start doing something like that since I have so many cards on hand. I’m so glad you were inspired.