Lost Lagoon Tones & Texture: Creating the Perfect Masculine Card

Hi Crafty Friends

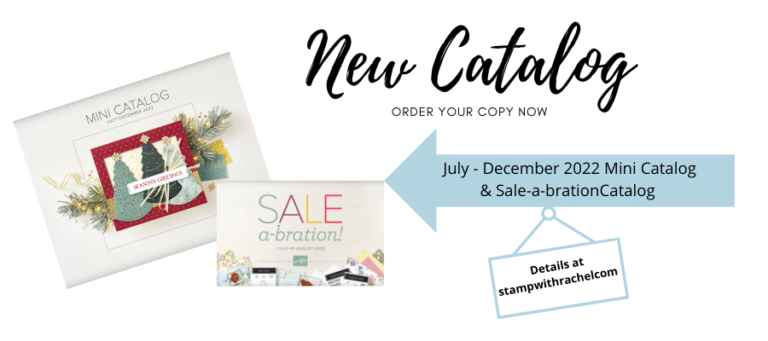
Today (31 March 2026) is the last day to sign up if you would like a free copy of the new catalog, The Catalog Mailing Programs ends tonight!
Click here to fill out the form for the latest catalog.

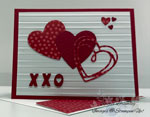
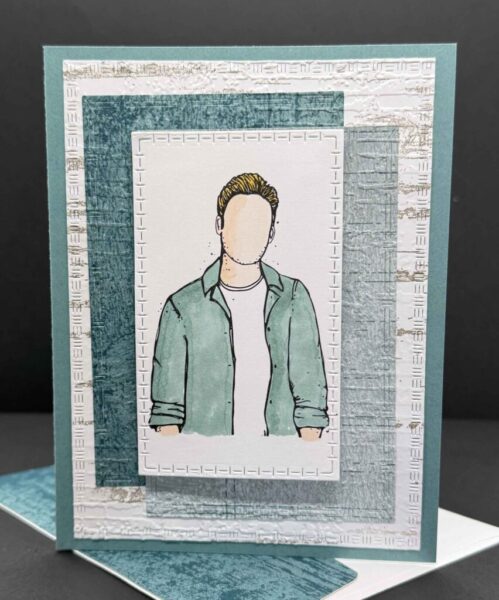
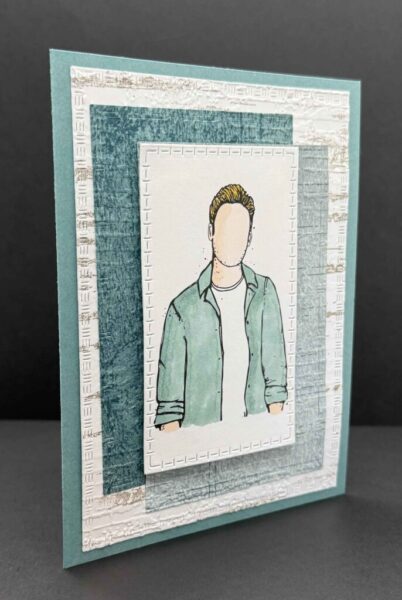
I love how a great masculine card can be both stylish and simple at the same time — and this one checks all the boxes! Whether you’re making it for a birthday, Father’s Day, or just a thinking-of-you card for the guy in your life, this design comes together quickly and looks so polished when it’s done!
Card Measurements:
- Base Card: Lost Lagoon Cardstock (8 1/2′ X 5 1/2′)
- Layer #1: Nature Walk Designer Series Paper (5 1/2′ X 4 1/4) before die cutting
- Layer #2: Nature Walk DSP (4 1/2″ x 3″) before die cutting
- Layer #2: Nature Walk DSP (4 1/2″ x 3″) before die cutting
- Top Panel: Basic White Cardstock (4 1/2′ X 3′) before die cutting
- Inside of Card: Basic White Cardstock (5 1/2″ x 4 1/4″) before die cutting
- Thin Strip: Nature Walk DSP (5 1/2″ x 1/4″) before die cutting
- Envelope Flap: Nature Walk DSP (6″ x 2 1/2″)
Card Instructions:
To begin, I folded the base card in half, using a Bone Folder to create a nice sharp crease. I took Layer #1 and stamped it with Gray Granite using the retired Birch Background Stamp and die cut it using the largest die in the Textured Notes Dies set, then cut Layers #2 and #3 using the third largest die from the same set. After adhering all three layers together (see the card photo for placement), I ran them through the Exposed Brick 3D Embossing Folder and attached everything to the base card.
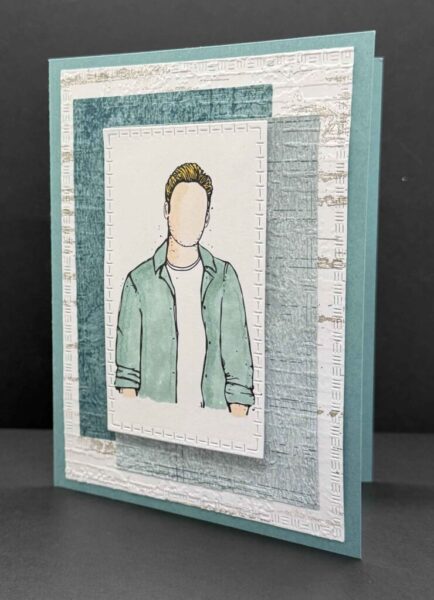
For the focal point, I printed a digital image onto Basic White Cardstock and colored it using Petal Pink Stampin’ Blends for the face, Lost Lagoon for the shirt, and Daffodil Delight for the hair. I then cut the image using the fourth die from the Textured Notes Dies set — the same set used for all three layers — and attached it to the front of the card with Stampin’ Dimensionals for a nice pop of dimension.
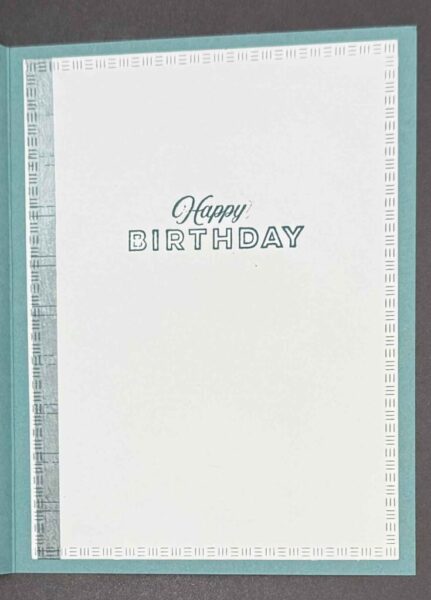
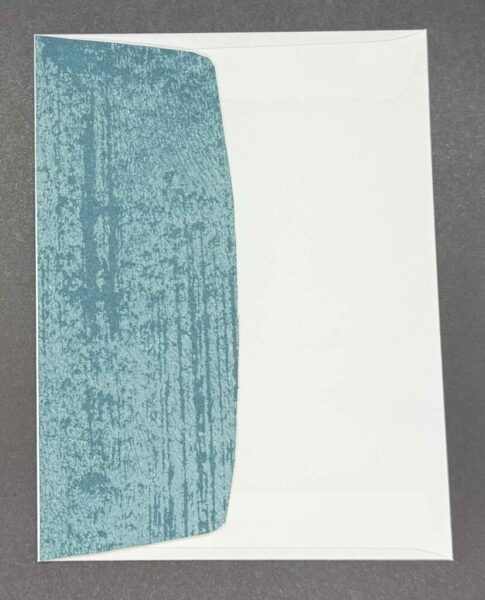
For the card interior, I adhered a thin strip of DSP along the left side of a piece of Basic White Cardstock, then cut it to size using the largest die from the Textured Notes Dies set. I then stamp the sentiment from the retired Celebrating You Stamp Set in Pretty Peacock Ink. To finish things off, I decorated the envelope flap with the same DSP used on the front of the card for a cohesive, polished look, then trimmed it to fit.

Thanks so much for stopping by today! I hope this card sparked some inspiration for your next crafting session. Be sure to browse through my Card Gallery for even more ideas—there’s always something new to try with your Stampin’ Up! supplies!
I truly appreciate you being part of my crafting community. Whether you need to stock up on supplies or just want to chat about your next project, I’m always here to help. Feel free to reach out anytime by phone or email—I love connecting with fellow crafters!
Happy stamping, and I’ll see you in the craft room soon!


Supplies