


Check out the new card keeper. We used it at our Make n Takes at Convention. And while you are on the video page, check out the cute, cute Shaker Frames Card technique. I'll b using it in one of my upcoming classes!
~~Rachel
From SU Website
August 2, 2011
We had a great response to the new Stampin' Card Keeper (item 124107) during the Make & Take sessions at convention! If you were unable to attend, we hope you have started to imagine all the possibilities this 2011 Holiday Mini Catalog product has to offer. From a beautiful handmade gift to a creative card holder, this handy box is easy to embellish for an end result that's both personalized and organized.
And, before you use the box to store your hand-stamped cards, here are some helpful tips for putting it together:
- Before removing the paper backing from the adhesive, lay the box flat with the adhesive strips facing down.
- Because the adhesive on the flaps is very sticky, remove the backing from only one strip at a time to prevent the flaps from accidentally adhering in the wrong place.
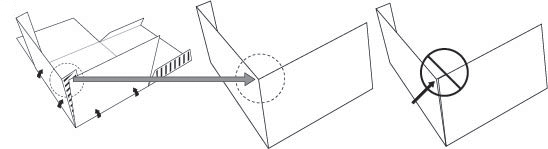
- For the lid to fit properly on a covered, assembled box, adhere the flaps to the inside of the box and align the edges and the top to create 90-degree angle squared corners, as pictured below.
These are just a few steps to help you get started. We have also posted a training video on the Holiday Mini Product Videos page of the demonstrator website with more tips and tricks. While you're there make sure to check out the other training videos for Holiday Mini products.
We hope this helps you prepare to showcase this product at future events so your customers will also imagine all the possibilities!
