


Technique – Faux Watercolor
Faux watercolor is easy to create with 2-Step Stamps. Using Stampin’ Write color markers to mix colors on a stamp gives the image a watercolor effect.
SUPPLIES:
Stamps: (w-128430, c-123804) Gently Falling, (w-130514, c-130517), Gorgeous Grunge, (w-130025, c-122887) Lacy and Lovely Paper: (102128) Chocolate Chip, (131203) Soft Sky, (131296) Baked Brown Sugar, (101650) Very Vanilla, (132184) Sweater Weather Designer Series Paper Ink: (126974) Early Espresso, (126975) Crumb Cake, (131174) Baked Brown Sugar Accessories: (130931) Candy Dots-Brights, (132140) 1-1/4” Burlap Ribbon, (104199) Linen Thread, Stampin Write Markers: (131260) 2013-2015 In-Colors, (105115) Pumpkin Pie, (131262) Cajun Craze, (113439) Big Shot, (129021) Window Frames Collection Framelits , (110755) Multipurpose Liquid Glue, (104430) Stampin’ Dimensionals , (103683) Glue Dots, (104294) Sticky Strip , (126189)Paper Piercing Tool , (126199) Stampin’ Pierce Mat , (127857) Festive Paper Piercing Pack , (101610) Stamping Sponges
INSTRUCTIONS:
1. Cut Chocolate Chip card stock 4-1/4” x 11” – score at 5-1/2” 2. Cut Sweater Weather DSP – 3-3/4” x 5” 3. Cut Soft Sky – 3’ x 3” – Cut using Big Shot and 3nd largest Window Frames Collection Framelit 4. Using Paper Piercing Tool, Stampin’ Pierce Mat and the template from the Festive Paper Piercing Pack, pierce Soft Sky card stock 5. Cut Very Vanilla – 2-1/2” x 2-1/2” – Cut using Big Shot and 2nd largest Window Frames Collection Framelit 6. Ink line stamp and the small dots stamp from Gorgeous Grunge stamp set with Early Espresso, stamp off once and stamp on Very Vanilla from step 5. Sponge edges with Crumb Cake ink. 7. Cut 4-1/2” Burlap Ribbon and trim flag points at one end. 8. Using the Baked Brown Sugar Marker, ink solid leaf stamp from the Gently Falling stamp set using a dabbing/swiping motion. 9. Using the Pumpkin Pie and Cajun Craze markers, continue to dab and swipe the stamp filling in the entire stamp, overlapping the colors. Stamp on Very Vanilla card stock. 10. Ink the outline leaf stamp with Early Espresso and stamp over the solid leaf stamped in step 9. The outline does not have to fit around the solid stamp. This gives the appearance of the Faux Watercolor effect. Fussy cut the leaf – does not have to be cut on the outline. 11. Stamp the acorn solid stamp with Baked Brown Sugar ink and the outline with Early Espresso ink and fussy cut. 12. Ink the Thank You stamp from the Lacy and Lovely stamp set with Early Espresso and stamp on Baked Brown Sugar card stock. Cut out and cut a flag in one end. 13. Assemble card – layer DSP on Chocolate Chip base, attach Burlap ribbon to the Sweater Weather DSP with Sticky Strip, layer the Very Vanilla onto the Soft Sky card stock with Multi-purpose Liquid Glue, layer on Burlap ribbon with Stampin’ Dimensionals, layer cut out leaf at an angle on the Very Vanilla. 14. Attach the sentiment at the bottom of the card and the acorn on the left end. 15. Tie a double bow with the Linen thread and attach to leaf with Glue Dots and center a Pumpkin Pie Candy Dot on the Linen Thread. Send the card in the mail to thank someone.
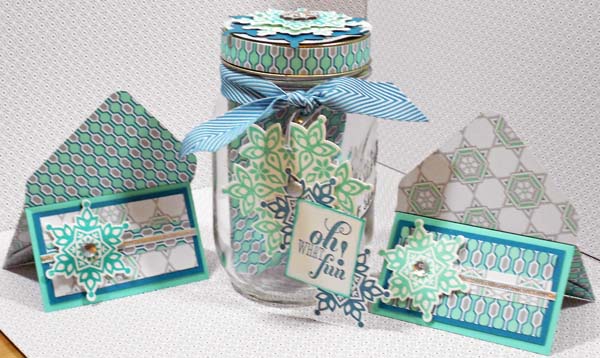
Non-Card/Scrapbook – Festive Flurry jar of Notes
To have on hand, or to give away, this jar of Wintery notes is great to have on hand when you need to dash off a quick love note or to tuck in a gift card (or cash).
SUPPLIES USED:
Stamps & Wheels: Festive Flurry Bundle (#133284, Wood-Mount; #133285, Clear-Mount; includes Festive Flurry Stamp Set #131778, Wood-Mount or #131781, Clear-Mount and Festive Flurry Framelits #132193); Christmas Messages Stamp Set (#131790, Wood-Mount; #131793, Clear-Mount) Card Stock & Paper: Coastal Cabana 8-1/2″ x 11″ Card Stock (#131297),3-1/2″ x 4″ (4); Island Indigo 8-1/2″ x 11″ Card Stock (#122923),3-3/4″ x 1-3/4″ (4) & 4″ x 4″; Shimmery White 8-1/2″ x 11″ Card Stock (#101910), 8-1/2″ x 5-1/2″ (2); Winter Frost Specialty Designer Series Paper (#132341), 5″ x 5″ (4), 1-1/2″ x 3″ (4), 3/8″ x 3″ (4); 1/2″ x 9-1/2″; Winter Frost Designer Series Paper Stack (#132183), 1 sheet Ink & Color: Island Indigo (#126986), Bermuda Bay (#131171) & Coastal Cabana (#131175) Classic Stampin’ Pads; Illuminate Glimmer Watermark Pad (#126857) Accessories & Tools: Big Shot Die-Cut Machine (#113439); Big Shot Magnetic Platform (#130658); Circles Collection Framelits™ (#130911), 5th largest; Stampin’ Trimmer Paper Cutter & Scorer (#126889); Envelope Punch Board (#133774); 1/8″ Silver Ribbon (#132137), 5″ (4), 6″; Large Rhinestone Basic Jewels (#129324); Basics Glimmer Brads (#121003), Silver; Frosted Finishes Embellishments (#132150); Island Indigo Chevron Ribbon (#131151), 18″; Paper-Piercing Tool (#126189); Stampin’ Pierce Mat (#126199); Sponge Daubers (#102892); Multipurpose Liquid Glue (#110755); SNAIL Adhesive (#104332); Stampin’ Dimensionals (#104430); Glue Dots (#103683); Sticky Strip (#104294); Bone Folder (#102300) Other: Canning Jar with ring & lid, 1/8″ hole punch
DIRECTIONS:
1. Run a thin line of glue inside ring at the bend of the top and side. Press lid into ring to spread the glue. Screw lid and ring on jar and set aside to dry. 2. On Shimmery White piece, stamp smallest snowflake image: 2 with Coastal Cabana, 2 with Island Indigo and 3 with Bermuda Bay pads. Stamp next to largest and next to smallest images with Coastal Cabana pad. 3. Line up Framelits around stamped images and die-cut all with Big Shot and Magnetic Platform. Note: you may need to secure Framelits with Post-Its, even on the Magnetic Platform, because the dies may move if your images are close to the edge or if you’re using two dies at once. 4. Layer 1-1/2″ x 3″Designer Series Paper on Island Indigo card stock 4 times. Center and adhere reverse side of 3/8″ x 3″ DSP to layer. Wrap 4-1/2″ piece of Silver ribbon around center and adhere to back of layer. I did two of each side of DSP to vary the designs. 5. Score all 4 Coastal Cabana pieces at 2″ along the 4″ side. Fold and crease well with Bone Folder. Adhere Island Indigo layers to card front with Glue Dots. Adhere small snowflakes to card fronts with Dimensionals: 2 Coastal Cabana and 2 Bermuda Bay. Attach a large Rhinestone in the center of each snowflake. 6. Create envelopes for 2″ x 3-1/2″ cards using the Envelope Punch Board and the 5″ x 5″ pieces of DSP. Adhere together, making two with one pattern for the outside and two with the reverse pattern for the outside and insert the finished cards, matching the front DSP layer to the envelope outside. Remove lid & ring and insert cards into the jar. 7. Adhere Sticky Strip around outside of ring. Attach 1/2″ strip of DSP and use more Sticky Strip to seal the overlap. 8. Die-cut circle from coordinating DSP pattern from Winter Frost Paper Stack. Die cut next to largest snowflake from Island Indigo square and sponge edges with Illuminate Pad. Layer on circle with Dimensionals. Layer next smallest Coastal Cabana-stamped snowflake on top and smallest Bermuda Bay-stamped snowflake on top of that, using Dimensionals. Attach Frosted Finishes embellishment to the center with Glue Dots. Adhere entire circle to lid with Dimensionals. 9. Stamp message with Island Indigo pad on Shimmery White scrap. Trim away excess. Sponge edges with Bermuda Bay pad. Adhere Island Indigo-stamped snowflakes behind message in opposite corners. 10. Line up message tag on next largest Coastal Cabana-stamped snowflake. Pierce and insert Glimmer Brad. Flatten prongs on back. Punch hole in one arm snowflake and loop Silver Ribbon through. 11. Tie Island Indigo Chevron ribbon around top of jar, threading silver loop through before knotting. Trim ends to suit.
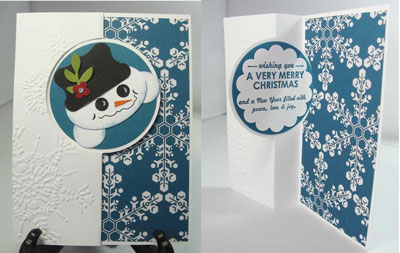
Card – Snowman Circle Flip Card
Supplies:
Set: #131751 (c) Wishing You; Card Stock: #122923 Island Indigo ; #100730 Whisper White; #119685 Cherry cobbler: #121045 Basic Black; #100702 Old Olive; #105117 Pumpkin Pie; #132341 Winter Frost Designer Paper; Ink: #126986 Island Indigo; Marker: #100082 Basic Black Marker; Punches: #119859 Extra Large Oval; #119851 Curly Label: #119857 Word Window; #118309 Itty Bitty Shapes Punch pack; #119873 3/4″ Circle; #118074 Owl Builder; #117191 Bird Builder; #120906 2 1/2″ Circle Punch; #118874 2 3/8″ Scallop Circle Punch; Big Shot: #133480 Circle Card Thinlit; #120902 Northern Flurry Embossing Folder; Accessories: #119246 Rhinestones; #105021 White Gel Pen;
Directions: 1. Add a 2 3/4″x 5 1/4″ piece of Designer Paper onto the right side of the card stock 2. Use the Circle Card Thinlit on white card stock (c/s) 3. Run the left hand panel of the card through the Northern Flurry Embossing Folder. 4. Punch out two 2 1/2″ circle of Island Indigo c/s. Add one to the front and one to the back of the circle. 5. Stamp the saying on white c/s and punch it out with the 2 3/8″ Scallop Circle Punch; Add to the back circle. 6. Punch out: 1 black piece with the Word Window 1 black piece with the Curly Label 2 black eyes with the Owl Builder 1 Old Olive branch with the Bird Builder 1 White Extra Large Oval 2 white 3/4″ Circles 1 Cherry Cobbler flower 7. Sponge the edges of the white punch outs and put the snowman together like you see in the picture. 8. You do need to trim off the bottom quarter of the Curly Label “hat” before you add the Word Window piece.
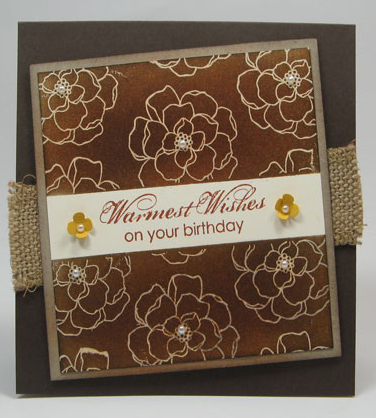
Card – emboss resist
CARD STOCK: 101650 Very Vanilla; 119686 Early Espresso; 120953 Crumb Cake; 131199 Crushed Curry ACCESSORIES: 101610 Sponges; 104430 Stampin’ Dimensionals; 132140 1-1/4” Burlap; 118309 Itty Bitty Shapes Punch Pack; 119247 Basic Pearls; 129053 Heat Tool; 109130 clear Embossing Powder; 103083 Embossing Buddy; 103683 Glue Dots; Copy Paper
2. Cut Crumb Cake card stock at 4-1/4” x 4-1/4”; Sponge edges with Early Espresso ink.
3. Cut Very Vanilla card stock at 4” x 4”. Rub Embossing Buddy over card stock to remove static. Stamp greeting in the middle with Cajun Craze ink.
4. Place a piece of copy paper over top section of sentiment and stamp flower image randomly with VersaMark. Place copy paper over bottom section of sentiment and continue to stamp flowers randomly with VersaMark.
5. Pour Clear Embossing Powder over flowers and shake off excess. Emboss with heat tool.
6. Placing copy paper to cover sentiment in the middle, sponge embossed flower images with Cajun Craze ink, then Early Espresso, and then a little of Crushed Curry ink. Wipe off excess ink with paper towel.
7. Place pearls on center of each embossed flower.
8. Punch 2 flowers from the Itty Bitty Shapes Punch Pack from Crushed Curry card stock and adhere to both sides of sentiment with Glue Dots. Adhere a pearl in the center of flower.
9. Attach a 5” Burlap piece to card base; adhere stamped cardstock onto Crumb Cake card stock. Adhere layer onto card base with 5 Stampin’ Dimensionals. Adhere 4-3/4” x 4-3/4” Very Vanilla card stock to inside of card base.
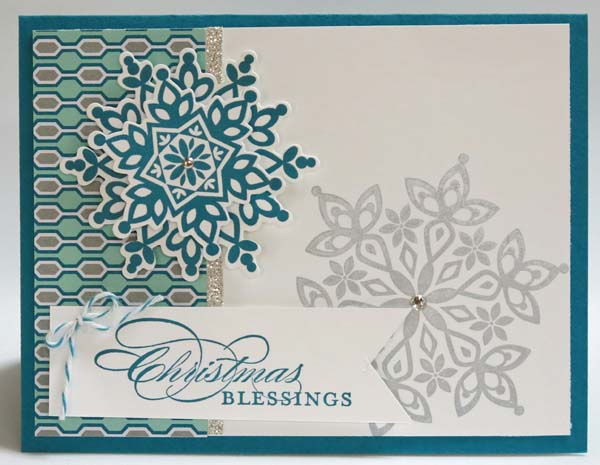
STEPS: Cut paper as follows: Island Indigo: 8-1/2″ x 5-1/2″ Whisper White: 4″ x 5-1/4″ (2); 3-1/2″ x 1″; scraps for stamping and cutting snowflakes Glimmer Paper: 4″ x 1/4″ Designer Paper: 4″ x 1-3/4″
1. Stamp second largest snowflake with Encore ink on bottom right corner of one larger piece of white cardstock. Adhere Designer paper to left side and then strip of Glimmer paper next to it. Layer onto folded card. Attach a rhinestone to the center of the snowflake.