Elegant Christmas Bouquet Card with Layered Arches

Hi Crafty Friends

- Black Friday Sale (starts Tuesday)
- Cyber Monday Paper Pumpkin (starts Dec 1)
- Product of the Month (starts Dec 1)
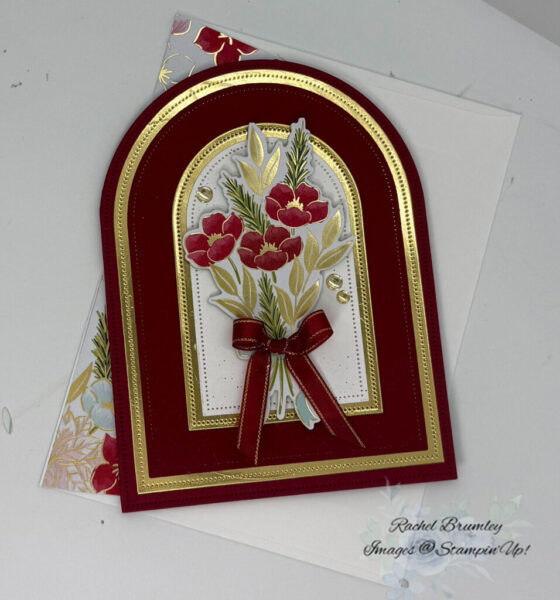
I’m absolutely in love with how this Christmas Greenery card turned out! The layered arch design creates such an elegant backdrop for the beautiful stamped bouquet, and that rich burgundy ribbon with gold edge ties everything together perfectly. Those deep red florals with soft green foliage capture that classic Christmas feel, while the dimensional layering and little gold sequins add just the right amount of sparkle. This Christmas Greenery bundle is quickly becoming one of my favorites for creating timeless holiday cards!
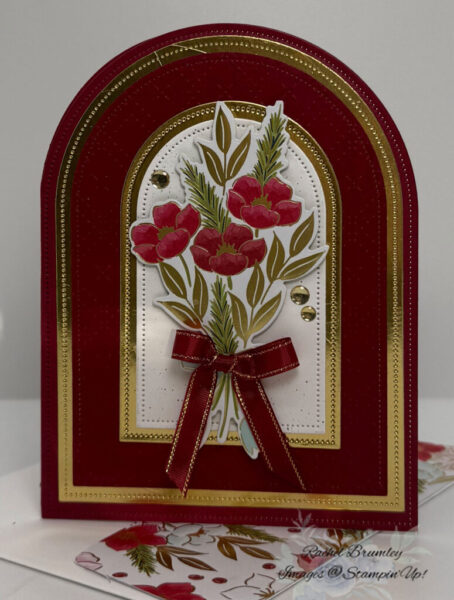
To begin, I die cut the largest arch from the Everyday Arches Dies using Cherry Cobbler cardstock. Next, I cut the second largest arch from Gold Foil Sheet, followed by another piece of Cherry Cobbler cardstock using the same die size, which I then embossed with the Beautiful Pattern Embossing Folder. I layered all three pieces together with Multi-purpose Liquid Glue.
For the focal point, I die cut the 3½” arch from Gold Foil Sheet and the 3¼” arch from Basic White cardstock. After attaching these two layers together, I adhered the completed piece to my base card to create the perfect frame for my Christmas Greenery bouquet.

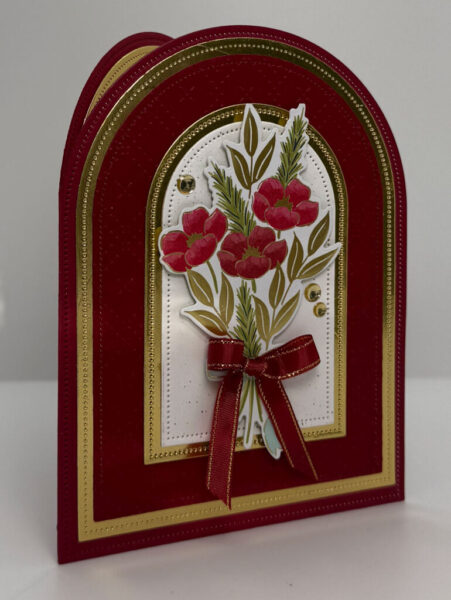
I die cut the floral bouquet from the Traditions of Christmas Designer Series Paper using the coordinating die from the Christmas Greenery Dies, then attached it to the front panel with Stampin’ Dimensionals for added depth. To finish the design, I tied a beautiful bow using the Cherry Cobbler & Gold Satin Ribbon and added a few Low Profile Dots for just the right amount of sparkle.

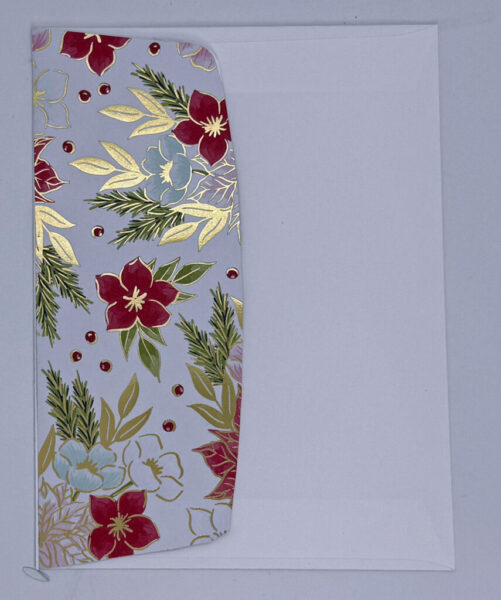
For the inside of the card, I die cut the second largest arch from Gold Foil Sheet and the third largest arch from Basic White cardstock using the Everyday Arches Dies. I stamped the sentiment in Cherry Cobbler ink, then fussy cut a small floral element from the Traditions of Christmas Designer Series Paper using my Paper Snips to add a delicate finishing touch. To complete the cohesive look, I also used the same Designer Series Paper on the envelope flap.
Thank you for visiting my blog! I hope today’s card design inspires your own Stampin’ Up! projects. Don’t forget to check out my Card Gallery for more ideas using your favorite Stampin’ Up! products. Your support means the world to me. If you need supplies or have any questions, I’m here to help as your Stampin’ Up! demonstrator—just give me a call or send me an email.
Happy stamping, and let’s keep crafting together!

Card Measurements:
- Base card: Cherry Cobbler Cardstock (8 1/2″ x 6 1/2″)
- Layer #1: Gold Foil Sheet (5 1/2″ x 4 1/4″)
- Layer #2: Cherry Cobbler Cardstock (4″ x 2 1/2″)
- Layer #3: Basic White Cardstock (3 1/2″ x 2 1/4″)
- Inside of card: Layer #1 Gold Foil Sheet (5 1/2″ x 4 1/4″)
- Layer #2: Basic White Cardstock (4″ x 2 1/2″)
- Envelope Flap: Traditions of Christmas DSP (6″ x 2 1/2″)

Supplies